OK folks, I was going to make this one another amplifier kit project, but I have enough on my plate for now. So I will put the schematic and parts list here on this page.
In keeping with my philosophy of keeping things simple, pure, acurate, high quality but inexpensive, I have designed this amp based on my 300B amp kit. It uses one power transformer for all components. It also uses DC on the filaments and solid state rectification. Before you go Aaaargh! about solid state, the only real thing... well actually two... about SS rectification versus tube is the pretty glow of the tube. Actually, a customer of mine built my MAG-1515 with solid state rectification, and another on his own with tube rectification. He likes the SS rectification much better because he says it is more dynamic and lifelike.
Not to mention everyone at a tube tasting get together I attended loved my 300B amp. Solid state B+ and filament. Go figure.
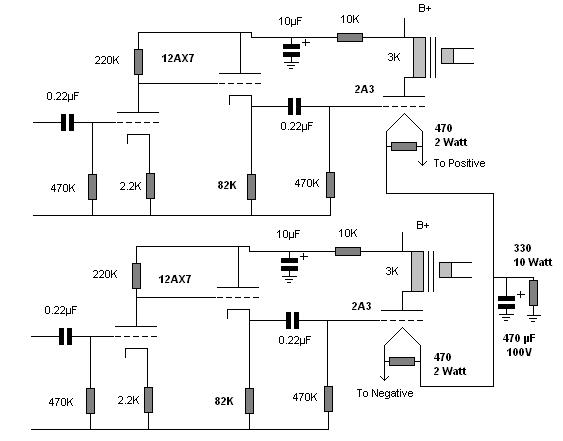
THE SCHEMATIC
OK, I got lazy with the actual schematic symbols, but I was pressed for time. The signal ground is the same as B+ ground, only I forgot to put the ground symbol at the signal ground points. Please reread the previous sentence before you have a panic attack and email me saying "It doesn't work! Where does signal ground go?"
This amp uses the rectifier 5 volt winding to provide the power to the 2A3 tubes. This eliminates two 2.5 volt transformers one would need for a stereo amp. That could cost upwards of $70 USD. Also, it uses a solid state bridge rectifier with a 10,000µF capacitor. This virtually eliminates the hum created by both the AC of the supply plus the 120 hertz created by the filament heating and cooling as the AC switches from plus-minus to minus-plus polarities and back again. So not only does one get a voltage with a small ripple, but one gets a steady constant heat.
OK, you are about to remind me that the 2A3 is a 2.5 volt tube. Fine. We will be stringing the tubes in series to obtain that 5 volts. Also note the symmetry of the filament connections for the 2A3. If you choose to use pin 1 of one 2A3 for the positive connection, then connect pin 2 to pin one of the other 2A3, and pin two of the other 2A3 to the negative of the 5 volt supply.
Many claim that a resistor is needed in series to make sure that the DC out is not over 5 volts. However, in my 300B I get no more than 5.1 volts. I guess the 3 amps drawn is sufficient to keep the voltage at 5 volts, and not the up to 7 volts one would normally get, due to capacitors tending to file up to about 80-90 percent of peak. I predict that this amp will have no difficulty maintaining that, since the 2A3 draws about 2.5 amps.
Please also note that the capacitors should be 400-600 volts, except where noted, and resistors 1/2 watt except where noted.
Here is the power supply:
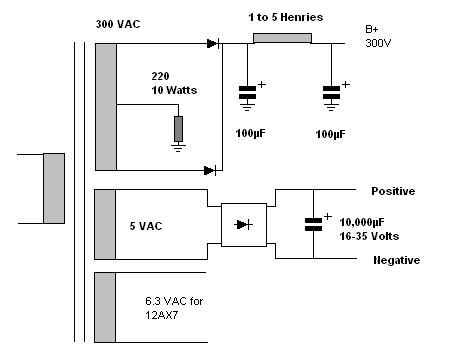
Again, note that the voltages are 400-600 volts for the capacitors except where noted. The power supply is actually putting out between 300 and 330 volts. The 220 ohm resistor is there to limit current so as not to overdraw the transformer. The transformers are usually designed for the easy on low current draw of tube rectifiers.
Try it out. you may be surprised, pleasantly, by the results.
My 300B actually uses a 12AT7, but for the sake of using a popular tube... well, you can still use it if you so choose. Do not use the 12AU7, though, because of its low mu.
Let me know what you think.